How to Inspect Your Roof for Damage: A Step-by-Step Guide
Walk through your roof inspection in six clear steps. Spot leaks, gutter issues, and damage early before Malaysia's next monsoon hits.
The five-minute roof check before the rain (How to Inspect Your Roof for Damage: A Step-by-Step Guide)
Most roof leaks in Malaysia do not appear out of nowhere.
Learning how to inspect your roof for damage: a step-by-step guide is the most effective way to catch early warning signs. You might spot a sagging gutter or a dark patch on a tile before water ever enters your home.
Most homeowners only notice the issue once water starts dripping through the ceiling.
Our team at Roofing Man has been helping Klang Valley homeowners catch these problems early since we started as a small crew of five in 2013.
A simple seasonal inspection is your best defence before the heavy October monsoons arrive. We use a specific six-step routine during our free site checks that works perfectly for any terrace house, semi-D, or bungalow.
Let us look at the specific signs of damage, what they actually mean, and how to respond.
Step 1: Walk the perimeter from the ground
Start your inspection outside and stay safely on the ground to spot cracked tiles, sagging ridges, and blocked gutters. Walk slowly around the entire building and look up at every angle. You can spot the most common problems from down here without taking any physical risks.
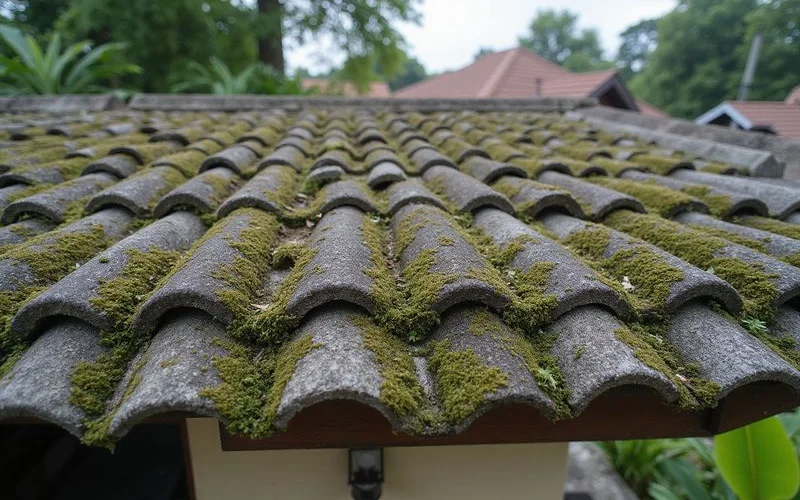
Our technicians always begin with a ground-level visual sweep. This initial stage often reveals around 70% of the issues that need attention. Concrete tiles, like the popular Monier styles found across the Klang Valley, often show visible signs of shifting or cracking from thermal expansion.
Look for these specific warning signs:
- Tiles that have shifted, cracked, or gone entirely missing
- Sagging or wavy ridge lines along the top of your house
- Moss or dark streaks on the tile surface, especially on shaded sides
- Sagging gutters or visible rust on metal sheets
- Plants growing out of the roof or gutters
Take a clear photo of anything that looks unusual. These photos will help you track changes over time or show a contractor exactly what you found.
Step 2: Check the ceilings and attic from inside
Head indoors and examine every ceiling with a torch held at an angle to reveal hidden water stains and bubbling paint. Our structural inspections frequently uncover issues hidden right above the plasterboard.
If your house has an accessible attic or roof space, climb up carefully with a torch. Switch off the main attic light first so you can spot any external light leaks.
If you see daylight coming through the roof, you have an active gap that requires immediate patching. Note its rough position to match it with your outside inspection later. Inside the attic, check for these issues:
- Brown or yellow water stains on timber rafters and battens
- Damp insulation or sagging ceiling plaster
- Mud trails or hollow timber, which indicate termite activity
- Black mould patches in corners, often caused by high humidity
Catching these indoor signs early prevents major structural rot.
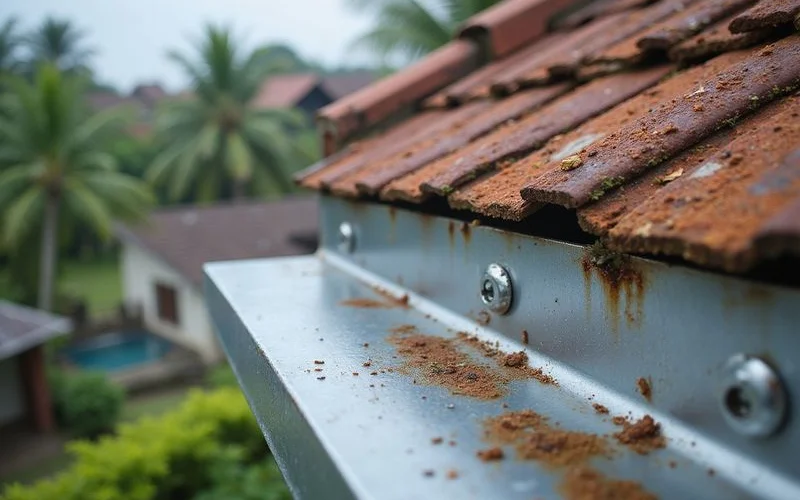
Step 3: Inspect gutters and downpipes
Clear your drainage channels and test the water flow to prevent dangerous blockages. Blocked gutters cause the majority of water damage cases we see on residential call-outs.
Water that cannot drain freely simply backs up under the lower edge of your tiles. This trapped moisture soaks the timber and eventually shows up as a nasty brown stain inside your house.
We always check that every length of gutter sits completely straight against the fascia board. Ensure no section sags between the support brackets. Pay close attention to these gutter warning signs:
- Rust spots along the metal channel
- Splits or cracks at the joint seams
- Standing water left inside after heavy rain
- Overflow marks on the outside of the gutter
If you can safely reach the gutter from a stable ladder, scoop out the accumulated leaves, twigs, and silt by hand. Run water from a garden hose along the channel to test the water flow. Slow drainage usually points to a partial blockage further down the downpipe.
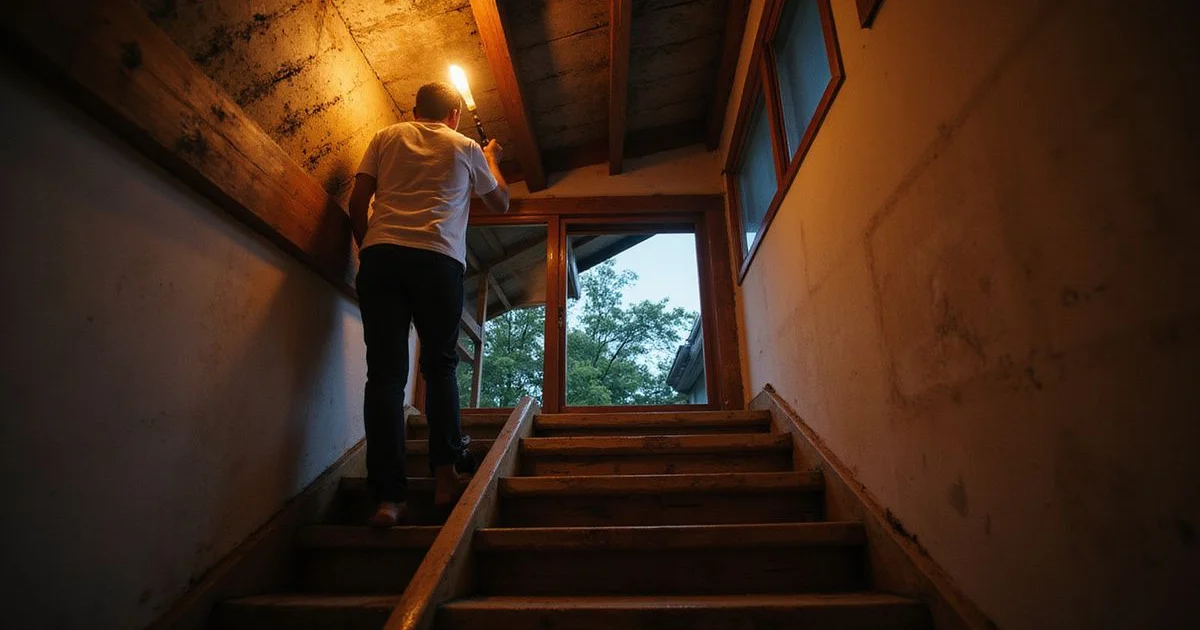
Step 4: Climb up only when conditions are safe
Only access the roof if the surface is completely dry and you have a secured ladder, staying clear of fragile tile centres. This step is strictly optional and should only be attempted with extreme caution.
You can spot many problems without ever leaving the ground or attic. Roof access presents genuine physical danger to anyone without proper training.
Our safety protocols require specific weather and equipment checks before anyone steps onto a slope. Skip this step completely if any of the following conditions apply:
- The roof is wet, dewy, or covered in slippery moss
- Your roof pitch is steeper than about 30 degrees
- You lack a fully extended ladder tied off securely at both ends
- You are alone in the house
If conditions are perfect and you have a helper, walk only on the lower edges. Never step on the weaker tile centres.
Concrete tiles can crack easily under foot pressure, and a broken tile instantly becomes your next leak. Stay off the roof entirely after rain or in the early morning when surfaces are slick.
Step 5: Look closely at flashings and ridges
Focus your attention on the metal flashings and the cement ridge pointing, as these junctions cause the majority of active leaks. If you do get safely onto the roof, these vulnerable points require immediate checking.
These junction points where two roof surfaces meet cause far more leaks than the open tile sections ever do. We inspect the metal flashing around chimneys, vents, soil pipes, and along any wall the roof meets. You are specifically looking for rust, lifted edges, missing sealant, and gaps where rainwater can drive in.
Walk the ridge line carefully and check the mortar pointing between the ridge tiles. The intense UV exposure and 30-degree daily heat in Malaysia cause standard mortar to degrade over time. Look out for these specific ridge defects:
- Hairline cracks along the cement joints
- Pieces of mortar missing completely
- Loose or easily shifted ridge tiles
- Dark water stains tracking down from the peak
Crumbling mortar is completely normal after 10 to 15 years, but it lets water seep in along the spine of the roof. You can patch a few hairline cracks easily enough. Widespread crumbling means the entire ridge needs professional re-pointing with a flexible compound.
Step 6: Document and prioritise repairs
Photograph every defect you find and group them into urgent, soon, and watch-list categories to manage repairs effectively. Photos give you a visual record to compare against your next inspection.
They also help any roofing contractor quote accurately without requiring a second site visit. Our project managers recommend grouping your findings into three distinct priority buckets.
This triage method stops you from feeling overwhelmed by minor wear and tear. Once the inspection is done, organize your list:
| Priority | What it covers | Typical action window |
|---|---|---|
| Urgent | Active leaks, missing tiles, lifted flashing | Within a week |
| Soon | Cracked tiles, rust spots, blocked gutters | Within a month |
| Watch | Faded paint, surface moss, mortar hairlines | Next inspection |
Tackling the urgent items first stops small problems from becoming expensive structural failures. Watch-list items can wait safely until the next round. Make a clear note and re-check those minor issues in six months.
Red flags that mean it is time to call a pro
Call a professional immediately if you spot structural sagging, daylight through the attic, or termite mud trails. Some findings during a self-inspection cross the line into hazardous territory.
Stop your DIY efforts and step away if you see severe structural warnings. We tell our Klang Valley clients to look out for these specific danger signs:
- A spongy or soft section of roof underfoot
- A widespread sag in the ridge or roof line
- Daylight clearly visible through the roof from inside the attic
- Active water dripping during light rain
- Termite mud trails or hollow-sounding rafters
- More than a handful of cracked or missing tiles in one single area
These signs usually point to deep issues with the timber structure, the underlayment, or the waterproofing membrane. Those critical layers sit hidden beneath the visible roof surface and require professional access to assess properly. Do not attempt to fix structural sagging or severe rot on your own.
Calling for backup on a leaking roof
Schedule a professional repair visit if your inspection uncovers structural damage or issues beyond your DIY comfort zone. A careful self-inspection once a year catches most problems while they are still cheap to fix.
We highly recommend doing this check just before the heavy October monsoon season begins. Anything past your current skill level is always worth a second pair of expert eyes.
Our team offers free site checks across the Klang Valley, complete with a written report and zero obligation.
This transparent approach gives you clear, actionable advice so you can make the best choice for your property. If your inspection turned up something concerning, book a roof leak repair visit with us today.
The technicians will evaluate the damage and quote the necessary work directly on the spot. We hope this routine showed you how to inspect your roof for damage: a step-by-step guide is truly your best defence against sudden leaks.
Tags
Need Professional Help?
If you're dealing with this issue, our team can help. Get an honest quote today.